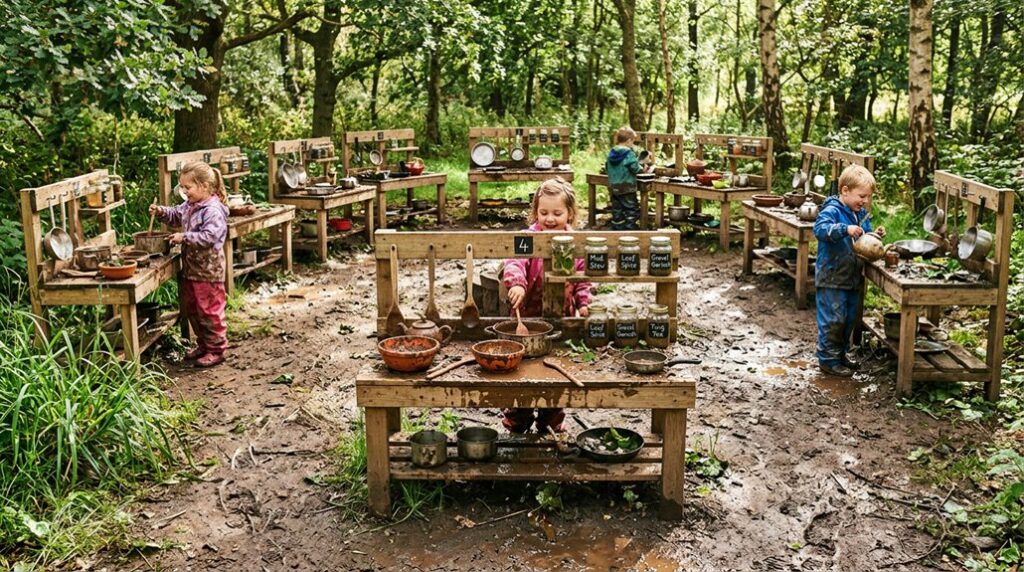
You’re about to create a backyard space where your kids can build, imagine, and play with purpose. Mud kitchens spark genuine curiosity. They combine sensory exploration with storytelling in ways screen time simply can’t match.
Whether you’ve got a sprawling yard or a compact patio, there’s a mud kitchen setup waiting for you. The best part? You can build one affordably using materials you already have. Here’s how to get started.
What Is a Mud Kitchen and Why Kids Need One?

Ever wondered why your kids spend hours playing with dirt and water while ignoring expensive toys?
A mud kitchen is an outdoor play space that creates an adventure zone in your backyard. It’s a work surface stocked with pots, pans, water, and natural ingredients where children create imaginary meals and explore endlessly.
Here’s why your kids need one: mud kitchens fuel imaginative play like nothing else. They build fine motor skills through scooping, mixing, and pouring. Sensory play happens naturally as children touch soil, water, and plants. Plus, outdoor time reduces stress while strengthening young minds.
You’ll notice benefits beyond playtime. Kids develop early math skills by measuring ingredients and counting portions. They practice literacy through recipe reading and menu writing. Most importantly, mud kitchens create a sense of belonging; a special place where creativity thrives and childhood flourishes.
Start Simple: Essential Tools and a Basic Work Surface

You don’t need fancy equipment to build a mud kitchen your kids will love. Start with essential tools: spoons, pots, and pans from your kitchen or thrift store. These simple items spark creative outdoor play immediately.
Next, create a basic work surface using recycled materials. Scrap wood, old pallets, or fallen tree branches cost nothing but deliver tremendous value. Stack pallets to form a sturdy counter at elbow height for comfortable use.
Position your mud kitchen in a shaded spot near your water source. This placement makes cleanup effortless and keeps kids cool during play sessions.
Add a dedicated wash bin alongside your basic work surface. This encourages independent responsibility and extends outdoor play time.
You’re building a community space where children explore, create, and belong.
Build a Budget-Friendly Mud Kitchen From Recycled Materials
You can build a great mud kitchen using pallets, cinder blocks, and old terracotta pots, materials you probably already have lying around. Stack those cinder blocks to create a sturdy, child-height work surface, then arrange wooden pallets as shelving for storage bins and recycled kitchen tools like spoons and muffin tins.
The best part? You’ll spend under $100 and create a sensory play space that’s both budget-smart and full of creative possibilities.
Upcycled Materials & Tools
Why spend hundreds of dollars when your garage, basement, or neighbor’s curb holds everything needed to build an excellent mud kitchen? I’ve discovered that upcycled materials create budget-friendly outdoor play into something special.
Pallets become sturdy work surfaces. Crates stack into modular storage units. Cinder blocks anchor the frame securely. Terracotta pots, muffin tins, and measuring cups mimic real kitchen tasks, sparking creativity through sensory exploration.
Here’s what I recommend: pair wooden crates with repurposed plastic play kitchen components for a layered, functional design. Add hooks for hanging tools. Position shallow water containers nearby using recycled plastic jugs or hose sprayers.
This approach creates engaging outdoor play spaces while respecting your wallet. You’ll join a community of parents building excellent mud kitchens from reclaimed treasures, proving resourcefulness beats expensive store-bought alternatives every time.
DIY Construction Methods
How can recycled materials become a sturdy, functional mud kitchen? You’ll discover great possibilities using items you already have.
I’ve found these construction methods work brilliantly:
- Stack cinder blocks as your base foundation for stability
- Arrange wooden pallets horizontally to create work surfaces
- Layer pavers beneath wooden tops for drainage and durability
- Attach plastic containers as modular, interchangeable components
- Secure crates vertically for organized tool storage
Building your DIY mud kitchen with repurposed materials means you’re creating something unique and personal. You’ll craft an elbow-height workspace perfect for outdoor play without breaking your budget.
Position your water source nearby for easy cleanup. This scalable approach lets you expand later as your kids’ imaginations grow. You’re not just building furniture; you’re constructing memories and joining a community of creative parents transforming outdoor spaces.
Cost-Effective Setup Tips
Building a mud kitchen doesn’t require spending hundreds of dollars or shopping for brand-new materials. I’ve discovered that repurposed pallets, wooden crates, and stacked cinder blocks create sturdy, rustic foundations. You’ll find these materials at construction sites or local businesses, often for free.
Start small with budget-friendly options under $100, like ready-made kits from HONEY JOY or OLAKIDS. Then customize with natural elements you gather: soil, fallen leaves, and colorful petals.
Your DIY setup needs only essential tools: bowls, wooden spoons, and muffin tins. These humble items turn outdoor play into imaginative cooking adventures.
For limited spaces, I recommend modular plastic containers or sensory bins. They’re portable, affordable, and easily adaptable.
This budget-friendly mud kitchen approach proves that creative outdoor play doesn’t demand expensive purchases, just resourcefulness and imagination.
Design Themed Stations (Bakery, Garden Shop, Potion Lab)

I’ll create distinct play zones that spark imagination and learning in your mud kitchen. You can set up a bustling Bakery Station with muffin tins and labeled price tags, a thriving Garden Shop with crates and jars, and a magical Potion Lab with herbs and mortars. Each station encourages kids to collaborate, roleplay, and explore sensory-rich pretend play.
These themed stations turn simple outdoor space into interconnected worlds where children build literacy skills while crafting mud masterpieces together.
Bakery Station Setup
A mud kitchen bakery station creates an outdoor play space where kids become bakers and shopkeepers. This setup encourages literacy, numeracy, and collaboration through imaginative scenarios.
Here’s what makes your bakery station successful:
- Elbow-height work surface for comfortable, independent play
- Essential props: muffin tins, rolling pins, cookie cutters, measuring cups
- Labeled ingredient bins with petal “flour” and conker “sugar”
- Small chalkboard for writing orders and recipes
- Pretend money and price lists for realistic transactions
You’ll want to include sensory-rich materials like herb-infused water and natural decorations. Kids shape mud pies and decorate with petals and stones. Then they “sell” creations using pebble currency.
This hands-on mud kitchen bakery station builds executive function, early writing skills, and business thinking while fostering teamwork among young entrepreneurs.
Garden Shop Roleplay
Once your bakery station’s flourishing, expand by adding a garden shop where kids become plant experts and merchants. I’d recommend setting up labeled jars for seeds, herb pots, and a peppermint-scented water dispenser to simulate authentic shop inventory. This garden shop roleplay creates a thriving marketplace within your mud kitchen.
Children assign themselves as shopkeepers and foragers, creating price lists and shopping slips using pebble currency. They’ll count change, practice numeracy, and develop communication skills through trading transactions. Use terracotta pots, seed packets, and dried herbs to establish distinct textures and visual appeal.
Rotating between stations deepens engagement in outdoor play. Kids collaborate, problem-solve, and plan inventory together. This integrated approach combines sensory exploration with meaningful learning, making your mud kitchen a welcoming community hub where children feel they belong.
Potion Lab Exploration
Why settle for just a bakery and garden shop when you can create an enchanting apothecary in your mud kitchen?
Your Potion Lab becomes the ultimate imaginative play destination. Children stay engaged for hours when they’re brewing potions and crafting nature-based recipes. Here’s what makes this themed station irresistible:
- Real herbs, flower petals, and conkers fuel creative mixing
- A printable potion menu guides ingredient selection and pricing
- Containers and spoons enable hands-on experimentation
- A mini chalkboard records recipe discoveries
- Themed role-play scenarios spark collaborative storytelling
Set up stations where your kids choose ingredients, follow mixing procedures, and “sell” their creations. This outdoor play setup turns ordinary mud into extraordinary adventures. The Mud Kitchen Potion Lab invites children into a world where imagination reigns supreme and belonging happens naturally through shared creative exploration.
Stock Your Mud Kitchen With Natural Ingredients and Textures
Because your mud kitchen thrives on variety, you’ll want to gather natural ingredients that spark curiosity and creativity. I recommend collecting soil, sand, pebbles, pinecones, seed pods, petals, and leaves for diverse sensory ingredients. These natural textures make ordinary outdoor play into imaginative exploration.
| Ingredient | Texture | Benefit |
|---|---|---|
| Soil & Sand | Grainy, soft | Foundation mixing |
| Pinecones & Pods | Rough, bumpy | Tactile discovery |
| Rose petals & Mint | Delicate, fragrant | Sensory engagement |
Store everything in labeled bins near your mud kitchen. This setup encourages independent access and sustainable foraging practices from your yard.
Pair these ingredients with muffin tins, sieves, and measuring cups. Your children will develop creativity while connecting with nature’s resources.
Make Mud Kitchen Potions, Recipes, and Pretend Treats

With your mud kitchen stocked and ready, it’s time to create imaginative concoctions with those natural ingredients. Your kids will love making up their own creations through play:
- Herb soups blend crushed leaves with water for steaming broths
- Nature milkshakes mix flower petals and mud for colorful drinks
- Flower cakes stack petals and ingredients into pretend desserts
- Magic potions combine everything for mysterious brews
- Themed recipes written on mini chalkboards inspire new ideas
Set up your mud kitchen cafe or potion lab with containers and spoons. Let your children experiment freely with open-ended recipes. Sign up for free potion kit lists to keep themed play sessions fresh and exciting.
Winter play adapts beautifully too. Add waterproof gear and candles for pretend heat during mud party celebrations. These potions spark creativity that’ll captivate your family for hours.
Mud Kitchen Water Play: Washing, Soaking, and Sensory Stations

How do you create a dynamic water wonderland with a mud kitchen? I’ll show you by adding washing stations, sensory stations, and soaking setups that’ll captivate every child in your community.
Start with a dedicated washing station featuring shallow water basins. Kids develop fine motor skills through scooping, squeezing, and scrubbing natural materials. Pair warm water with soil in sensory stations to observe how consistency changes dramatically. This hands-on exploration builds confidence and curiosity.
Next, create soaking stations using waterproof containers. Marinate flower petals, conkers, and clay-like substances to soften textures before shaping. Children discover how water changes materials over time.
Install easy-to-clean surfaces like sealed wood or concrete around your water play areas. Add waterproof storage nearby. These design choices support year-round mud kitchen water play while keeping cleanup manageable and enjoyable for everyone involved.
Creative Activity Ideas: Foraging, Role-Play, and Storytelling

Your mud kitchen becomes a vibrant world of imagination when you add foraging, role-play, and storytelling into the mix. You’ll gather natural treasures like leaves, pinecones, acorns, and seeds to create magical recipes and potions. These activities build social skills while you play together.
Create themed corners in your mud kitchen:
- Mud Kitchen Cafe: Use printed menus and role-play as servers and customers
- Outdoor Shop: Practice turn-taking with pebble currency and collaborative planning
- Potion Lab: Mix natural ingredients while creating fantastical brews
- Story-Inspired Themes: Connect tales like *Room on the Broom* to your recipes
- Literacy Integration: Write invitations, shopping lists, and menus together
You’ll discover that foraging grounds your imagination in nature while role-play strengthens friendships. Storytelling weaves everything together, creating memorable outdoor adventures your community will cherish.
Adapt Your Mud Kitchen to Small Spaces, Patios, and Apartments

Even the tiniest outdoor space can host an engaging mud kitchen that sparks creative play. I’ve discovered that you don’t need a sprawling backyard to create this setup.
Consider mounting a vertical surface with hooks on your patio wall. This strategy maximizes elbow-room while keeping tools organized and accessible. For apartments, repurpose a plastic play kitchen or modular bins as your foundation; they’re affordable and portable.
Nest plastic containers and bowls inside a storage tote for compact organization. Add a shallow water source like a sprayer bottle or small watering can nearby. Include a rinse bin that you can relocate as needed.
Don’t overlook protection. Incorporate shade, weatherproofing, and easy-clean surfaces like plastic mats. These elements reduce maintenance while maintaining hygiene in restricted outdoor play areas.
Safety, Cleanup Routines, and Age-Appropriate Supervision

I’ve got to tell you, keeping your mud kitchen safe starts with two key practices that will work well. First, I choose only non-toxic, locally identifiable plants and materials while staying vigilant about water depth and removing choking hazards like tiny seeds or hard objects. Second, I supervise actively during play, especially with toddlers, and establish a solid cleanup routine that includes rinsing tools, wiping surfaces, and storing everything in labeled bins to prevent mold and mess.
Safe Plant Selection Practices
How can you create a mud kitchen space where kids play safely without worrying about toxic plants or allergic reactions? I’ll show you how smart plant safety choices protect everyone while keeping outdoor play fun and engaging.
Start by selecting non-toxic plants that won’t harm curious hands or mouths:
- Choose herbs like basil and mint, which are safe, aromatic, and clearly identifiable
- Avoid flowering species with high pollen that trigger allergies
- Remove prickly plants and toxic varieties before play begins
- Inspect your garden regularly for dangerous additions
- Use only edible greens you’ve positively identified
I recommend creating separate bins for different plants and materials. This prevents cross-contamination during play. Label everything clearly so you instantly recognize what’s safe.
Your kids deserve a mud kitchen where exploration feels worry-free, and you can relax knowing allergy prevention and plant safety work together seamlessly.
Water Safety And Supervision
I’ve established a clear cleanup routine that protects our play space. After playtime, I rinse tools, dry them thoroughly, and drain water completely. This prevents slipping hazards and mold growth that undermines safety.
Age-appropriate supervision matters too. Children ages one through three need close monitoring, while older kids benefit from shared responsibility for turn-taking and safe tool use. By staying present and engaged, you’ll create a water-safe environment where creative outdoor play can flourish with confidence.