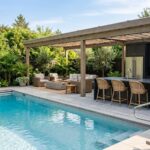
Picture your backyard becoming a culinary gathering place, just like those beautiful outdoor spaces you’ve admired. I’m here to show you how.
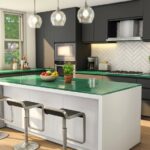
Whether you’re drawn to sleek, modern designs or warm, rustic charm, a Green Egg kitchen brings serious cooking power to your home. The right size, layout, and materials are important. Let’s explore what’s possible for your space.
Choose Your Big Green Egg Size and Style for Your Space

How do you want your Big Green Egg to fit into your outdoor kitchen? Your choice matters because it shapes your entire cooking experience. I’d recommend starting by selecting your Egg size—2XL, XL, or Large—since this determines which installation style works best.
Your Big Green Egg size determines your installation style and shapes your entire outdoor cooking experience.
Pedestal stands offer flexibility, elevating your Egg on an open base with storage underneath for smaller models. Drop-in stands create that built-in look by nesting your Egg in a sleeve while keeping the top accessible. Recessed stands deliver a seamless, integrated appearance with optional drawer storage below.
Consider your outdoor kitchen designs carefully. Verify compatibility with your space before committing. Each installation style brings different advantages to your Big Green Egg setup.
Think about how you’ll use it daily. What matters most, easy access, storage, or polished appearance? Your answer guides your perfect choice.
Design Your Outdoor Kitchen Layout: Pedestal, Drop-In, or Built-In

I’ll help you choose the perfect layout that creates an excellent outdoor entertaining space. You have three bold options: pedestal setups that raise your Egg to comfortable cooking height, drop-in configurations that nestle it seamlessly into your island, or recessed designs that offer that striking built-in look.
Let’s explore how each style matches your space, your Egg size, and the outdoor kitchen you’ve been imagining.
Pedestal Setup Benefits
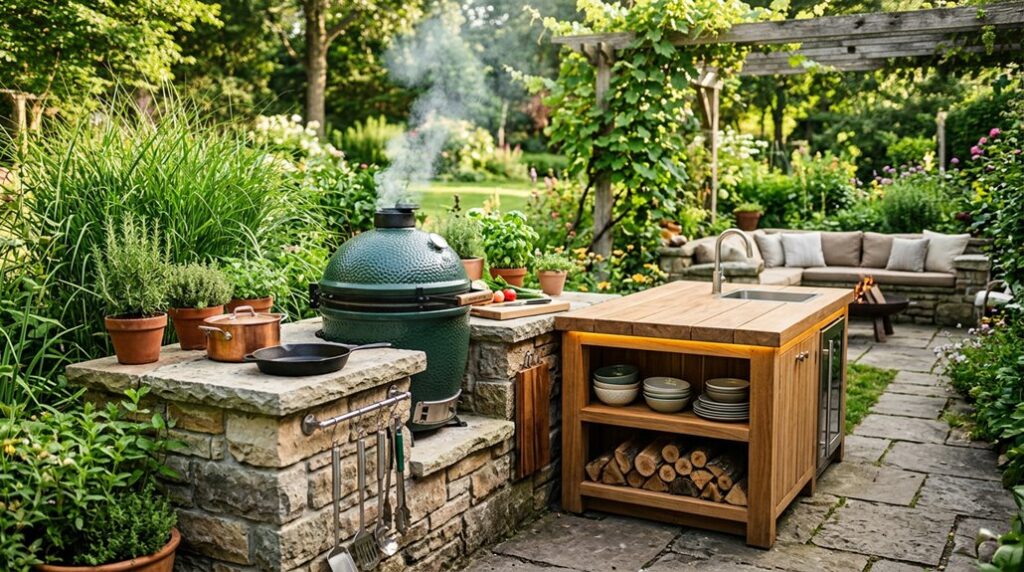
A pedestal stand makes your Big Green Egg the centerpiece your outdoor kitchen deserves. This setup raises your Egg to comfortable cooking height while keeping it beautifully visible above your island surface. You’ll love the flexibility; the open sides provide handy storage for smaller Egg models and prep supplies without sacrificing style.
I recommend pairing your pedestal stand with surrounding counter space for a unified appearance. This arrangement lets you maintain that built-in aesthetic while keeping your Egg easily repositionable. You’re not locked into one spot; you can adjust your layout whenever inspiration strikes.
The best part? You’ll access everything effortlessly. Cleaning, fueling, and auxiliary tasks remain simple and straightforward. Your pedestal setup delivers that polished outdoor kitchen feeling while preserving the portability and functionality you want. Join the community of outdoor enthusiasts who’ve discovered this perfect balance.
Drop-In Installation Considerations
What if your Big Green Egg could blend seamlessly into your island like it was always meant to be there?
Drop-in installations create that beautiful, built-in appearance you’ve been dreaming about. Your Egg nests perfectly into a sleeve within your island, keeping the top exposed while the bottom sits safely inside. You’ll maintain full access to the draft door for effortless cooking control.
Here’s what you need to know:
- Confirm size compatibility with a dealer before committing to your design
- Plan professional cutout sizing for your island’s specific layout
- Make sure your cabinet and ventilation support the Egg’s heat requirements
- Choose materials that complement your outdoor aesthetic beautifully
This seamless integration creates a cooking space that feels cohesive and sophisticated. Your outdoor kitchen becomes an extension of your home’s style, a place where you truly belong.
Built-In Kitchen Integration
How you position your Big Green Egg shapes your entire outdoor kitchen’s personality and function. Built-in kitchen integration allows your Egg to transition from a standalone grill into a central feature that belongs in your space.
I recommend coordinating your Egg installation with surrounding cabinetry and countertops for a unified appearance. Choose a pedestal setup if you want accessible storage on open sides. Select drop-in mounting for that polished, island-integrated appearance with full draft door access. Consider recessed installations for striking visual impact; they hollow out your island front and tuck a metal sleeve underneath.
Confirm compatibility with dealer specifications before committing. Make sure proper cutouts and mounting complement warm textured brick or marble backsplashes nearby. This thoughtful outdoor kitchen integration creates a gathering space where your Egg becomes the bold focal point everyone wants to gather around.
Select the Right Base System to Match Your Vision

I’ve found that choosing your base system is where your outdoor kitchen truly comes together. You’ll want to think about both the footprint you’re working with, whether you need a compact Nest stand or expansive Modular setup, and the materials that’ll stand up to your climate, like powder-coated steel and stainless steel inserts.
The right base doesn’t just hold your Egg; it grows with your vision, letting you add storage, expand workspace, and create the weatherproof kitchen you’ve imagined.
Base Size and Layout
Why settle for a cramped cooking space when you can build the perfect foundation for your outdoor kitchen?
The right base size and layout creates an entertaining hub in your backyard. Consider these options:
- Modular Nest – Start small and expand as your needs grow, adding prep surfaces gradually
- Acacia Table – Surrounds your Egg with generous dedicated prep space and smart storage solutions
- Modern Farmhouse Table – Combines rustic charm with galvanized steel durability for lasting outdoor appeal
- Nest Frame – Offers classic stability at ideal cooking height, perfect for any Egg size
Your layout determines workflow and comfort. Measure your space honestly. Think about where guests gather and how you’ll move between prep and cooking zones.
The Acacia Table gives you immediate functionality with built-in storage. The Modular Nest lets you invest gradually while growing your setup. Choose what matches both your space and your entertaining style.
Material and Durability Options
Now that you’ve mapped out your ideal layout, it’s time to pick materials that’ll stand up to sun, rain, and years of entertaining. I recommend premium aluminum with powder-coated finishes; they’re rust and rot resistant, keeping your space looking sharp for decades.
The Challenger 83 Outdoor Kitchen Island features weather-sealed cabinets and galvanized screws for true outdoor durability. You’ll also love the solid acacia wood inserts, which blend sustainability with long-lasting performance. For ceramic grill compatibility, these islands come pre-cut to fit Big Green Egg and similar models perfectly. Fingerprint-resistant surfaces and 304 stainless steel components protect against corrosion.
Choose materials that match your style while protecting your investment. This foundation helps your outdoor kitchen become the gathering spot your friends deserve.
Plan Your Countertops, Storage, and Work Zones

How do you create a fully functional outdoor kitchen with a Big Green Egg setup? I’ll show you how to plan smart countertops and storage zones that’ll make cooking outdoors easier and more enjoyable.
Consider these essentials:
- Ready-made Acacia Tables provide solid bases with built-in prep space and storage
- Modular EGG Workspace combines frames and cabinets for customizable layouts
- Expansion Frame offers three open storage levels with a worktop for your essentials
- Expansion Cabinet keeps charcoal, ingredients, and dishes protected from weather
I recommend pairing stainless steel inserts with sustainably sourced acacia wood panels. This combination creates durable countertops that withstand outdoor conditions while looking beautiful. You’ll appreciate how powder-coated steel frames resist rust and weather damage.
Plan your work zones strategically. Place prep areas near your EGG, storage beside it, and serving stations nearby. You’re building an outdoor kitchen that brings everyone together.
Integrate Complementary Appliances and Accessories

With your foundation built, it’s time to expand what your Big Green Egg can do. I’m talking about accessories that enhance your outdoor kitchen design into a powerful cooking zone. The EGGspander Kit opens up multi-zone cooking capabilities, letting you roast, smoke, and bake simultaneously. Add a Wireless Thermometer for precise temperature control. Consider the Pizza Wedge for crispy, wood-fired pizzas. A Rotisserie attachment brings restaurant-quality meats to your gatherings.
| Accessory | Function | Why You’ll Love It |
|---|---|---|
| EGGspander Kit | Multi-zone cooking | Expand your cooking potential |
| Wireless Thermometer | Temperature monitoring | Cook with confidence |
| Pizza Wedge | Specialized baking | Impress your crowd |
| Rotisserie | Roasted meats | Professional results |
These complementary tools improve your entertaining experience. You’re building something remarkable, a space where memories happen.
Create a Cohesive Look With Cladding and Finishes

The real magic happens when your Big Green Egg blends smoothly into your outdoor kitchen’s design. You’ll create a beautiful space that feels well-planned and polished by choosing the right cladding finishes.
Here’s how to achieve that unified appearance:
- Select cladding materials like stone, tile, or stucco that complement your Egg’s iconic shape and color.
- Match your island structure with weatherproof aluminum components and sealed doors that protect against elements.
- Choose custom color ranges and finished back panels that align with your outdoor aesthetic perfectly.
- Explore ready-made options like the Acacia Table or Modular Nest for built-in workspaces matching your design.
These choices turn your Big Green Egg from a standalone cooker into a striking centerpiece. You’re creating an outdoor kitchen that feels like it was designed as one unified vision; a space where you and your guests truly belong.
Maximize Comfort With Shade, Lighting, and Ventilation

I’ll show you how strategic shade, smart lighting, and proper ventilation create a comfortable, functional outdoor kitchen around your Green Egg. You’ll want to install canopies or awnings overhead to shield yourself from intense sun while you’re cooking those long, delicious meals.
Adding task lighting over your countertops and ambient lighting around the Egg keeps you working safely at night while helping heat and smoke drift away from your guests.
Strategic Shade Solutions
How do you cook comfortably under the blazing sun without sacrificing your Green Egg’s performance? The answer lies in smart shade solutions for your outdoor kitchen.
I recommend considering these essential options:
- Umbrellas – Portable and flexible, they shield your cooking zone instantly.
- Pergolas – Sturdy structures that provide consistent coverage while maintaining airflow.
- Motorized shade systems – Modern options that retract when you need full sun exposure.
- Vented enclosures – Protective walls that prevent smoke buildup while reducing heat.
Strategic shade reduces heat buildup around your Egg, boosting fuel efficiency during long cooks. You’ll stay comfortable while your Egg performs at its peak.
Shading protects your outdoor kitchen’s countertops and cabinets from harsh UV exposure and weathering. Build your desired outdoor space by investing in shade solutions that work for your lifestyle and cooking style.
Ambient Lighting Design
Why settle for a shadowy outdoor kitchen when strategic lighting makes your space more inviting? I’d recommend layering your LED lighting design with task lights above prep zones and soft, diffuse illumination around seating areas. This approach reduces glare near your Big Green Egg while creating a pleasant atmosphere that invites gatherings.
Choose weatherproof LED fixtures rated IP65+ to handle rain, humidity, and temperature changes. Select color temperatures between 3000–4000K to enhance your space’s personality. Warmer tones complement stone countertops and textured brick beautifully.
Position lights to work with your ventilation layout, preventing smoke buildup without sacrificing brightness. Your outdoor kitchen becomes functional and welcoming, a place where family and friends naturally want to spend time together around your prized Egg.
Proper Ventilation Systems
Smoke pooling around your seating area while you’re grilling? You need proper ventilation in your outdoor kitchen. Good airflow improves your cooking experience completely.
Here’s how I’d approach ventilation:
- Choose open-front island designs that prevent smoke from building up near guests
- Install integrated exhaust features directly above your Green Egg for immediate smoke removal
- Add ceiling or wall fans to push air through your space strategically
- Combine ventilation with shade structures like pergolas to enhance airflow patterns
These elements work together well. When you pair ventilation with overhead fans, you’ll notice immediate comfort improvements. Your guests won’t retreat indoors anymore.
You’re creating an inviting outdoor kitchen where everyone wants to gather. Proper ventilation isn’t just practical, it’s necessary for an enjoyable cooking space that keeps everyone comfortable during those long cooking sessions.
Budget Your Build: From Modular to Custom Installations

Since you’re ready to create your outdoor kitchen, you have excellent options that fit any budget. Start with modular setups like the Acacia Table or Modular Nest, beginning at just $2,649.99. These ready-made configurations let you build without complicated assembly.
Want more flexibility? Custom installations using the Modular EGG Workspace give you complete control. Combine the EGG Frame with Expansion Frames and Cabinets to design your perfect layout. Add stainless steel shelves for charcoal storage and ingredients exactly where you want them.
For premium setups, the XL Modern Farmhouse Table offers luxury at $5,899.99. The pre-assembled Challenger 83 Island arrives ready to use in just 7–14 business days. Custom orders take 6–8 weeks but reward you with a personalized masterpiece.
Tackle Common DIY Challenges and Installation Mistakes

You’ve chosen your perfect modular setup or custom design—now comes the real work. I’ll walk you through the biggest pitfalls that trap DIYers and how you’ll avoid them.
- Level your site properly before installation; uneven ground causes major structural problems later
- Seal everything against water using cement board and fiber mesh on seams to prevent damage
- Measure your Big Green Egg twice against your island opening. Not all 30–36 inch grills fit XL eggs
- Choose metal frames over wood to prevent warping in your outdoor kitchen environment
Incorrect countertop cutouts derail drop-in setups fast. I recommend metal framing with weatherproof cladding for rock-solid stability.
Don’t underestimate ventilation and storage. Cramped expansion cabinets waste your investment. Plan adequate space for charcoal, accessories, and multi-zone cooking gear. Getting these fundamentals right makes your Big Green Egg experience rewarding instead of frustrating.
Bring Your Design to Life: Next Steps and Professional Resources

Ready to bring your outdoor kitchen vision to life? You’ve got exciting options ahead. Start by using the free online design tool to visualize your Big Green Egg setup. This helps you explore pedestal, drop-in sleeve, or recessed configurations before committing.
Next, decide between DIY and ready-made solutions. If you’re tackling construction yourself, follow the step-by-step sequence: site prep, metal frame, cement board, curing, and cladding. For faster results, consider pre-built options like the Acacia Table or Challenger Designs’ 83-inch aluminum island with built-in grill cutouts.
Connect with design professionals who understand outdoor kitchens. They’ll help you select materials, confirm proper ventilation, and create a unified space. Your outdoor kitchen becomes the gathering spot your community craves, a place where memories happen.